User Lifecycle Management
Overview
Through the App Management and User Management sections of the Akku dashboard, administrators can perform automated user account lifecycle management across third-party applications. This ensures that account creation, role assignments, and access revocations happen seamlessly. By integrating provisioning capabilities, administrators can ensure that users are granted access to the right applications with appropriate permissions - automatically and securely.
In this section of the user guide, we will cover the following:
- Configuring Provisioning for apps
- Groups, Roles, and OU Mapping
- Functional Testing
- App and User Deletion
Navigation Path
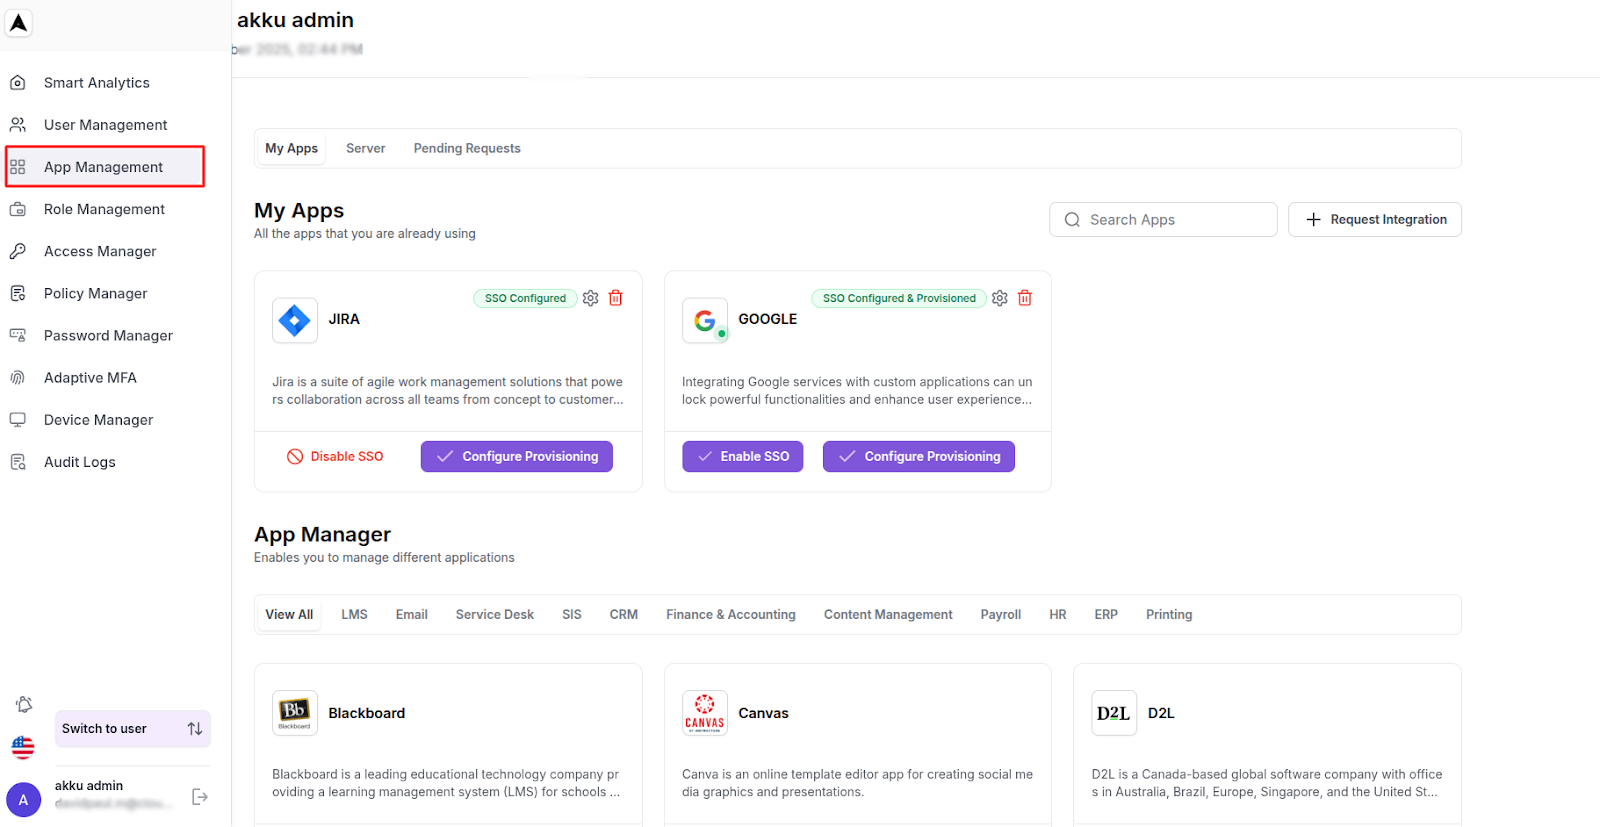
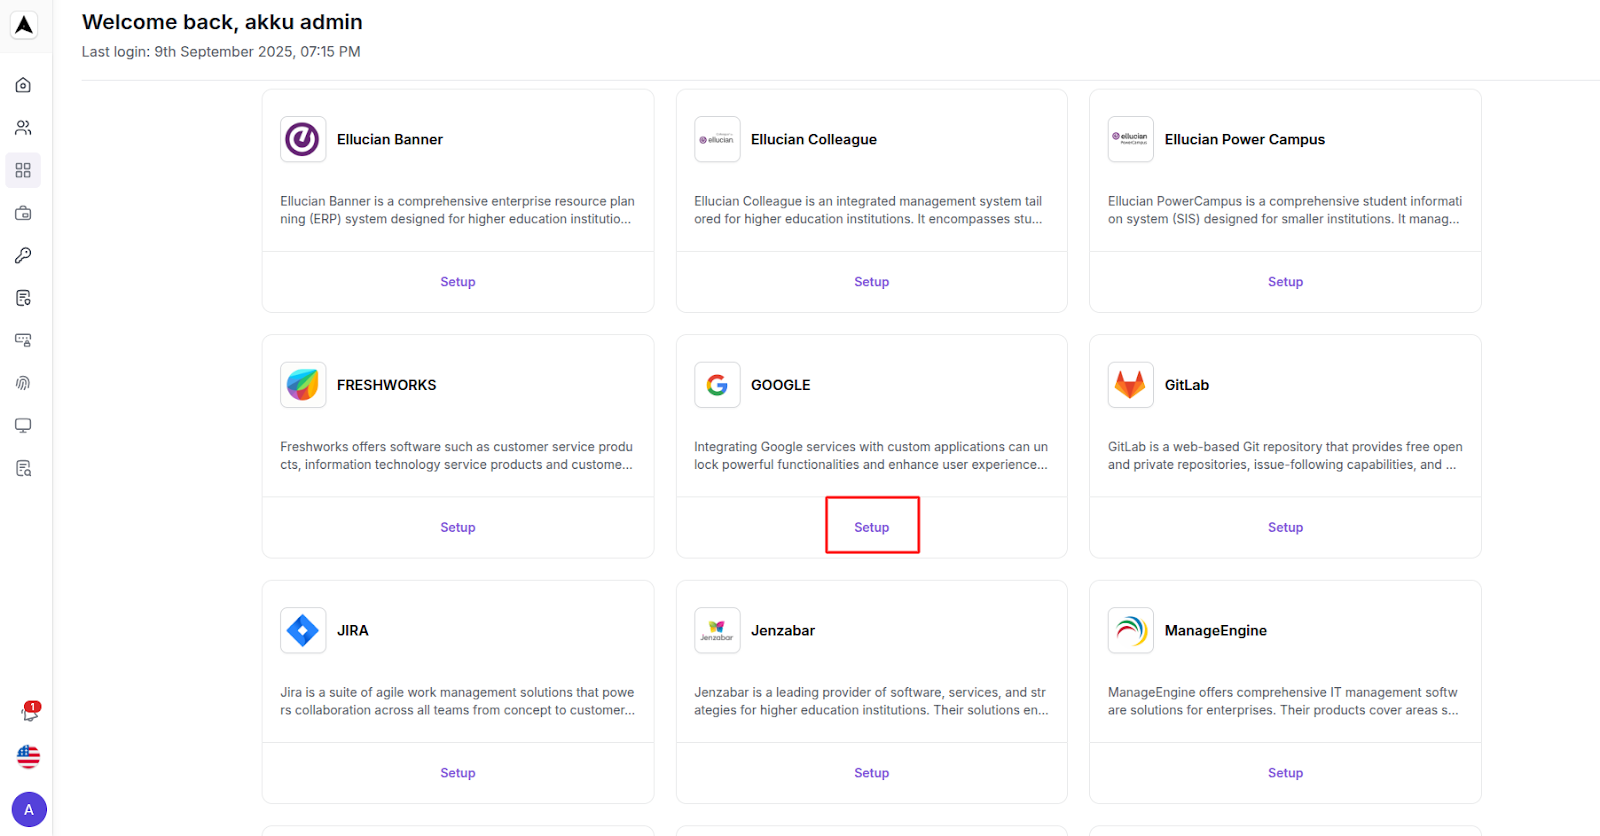
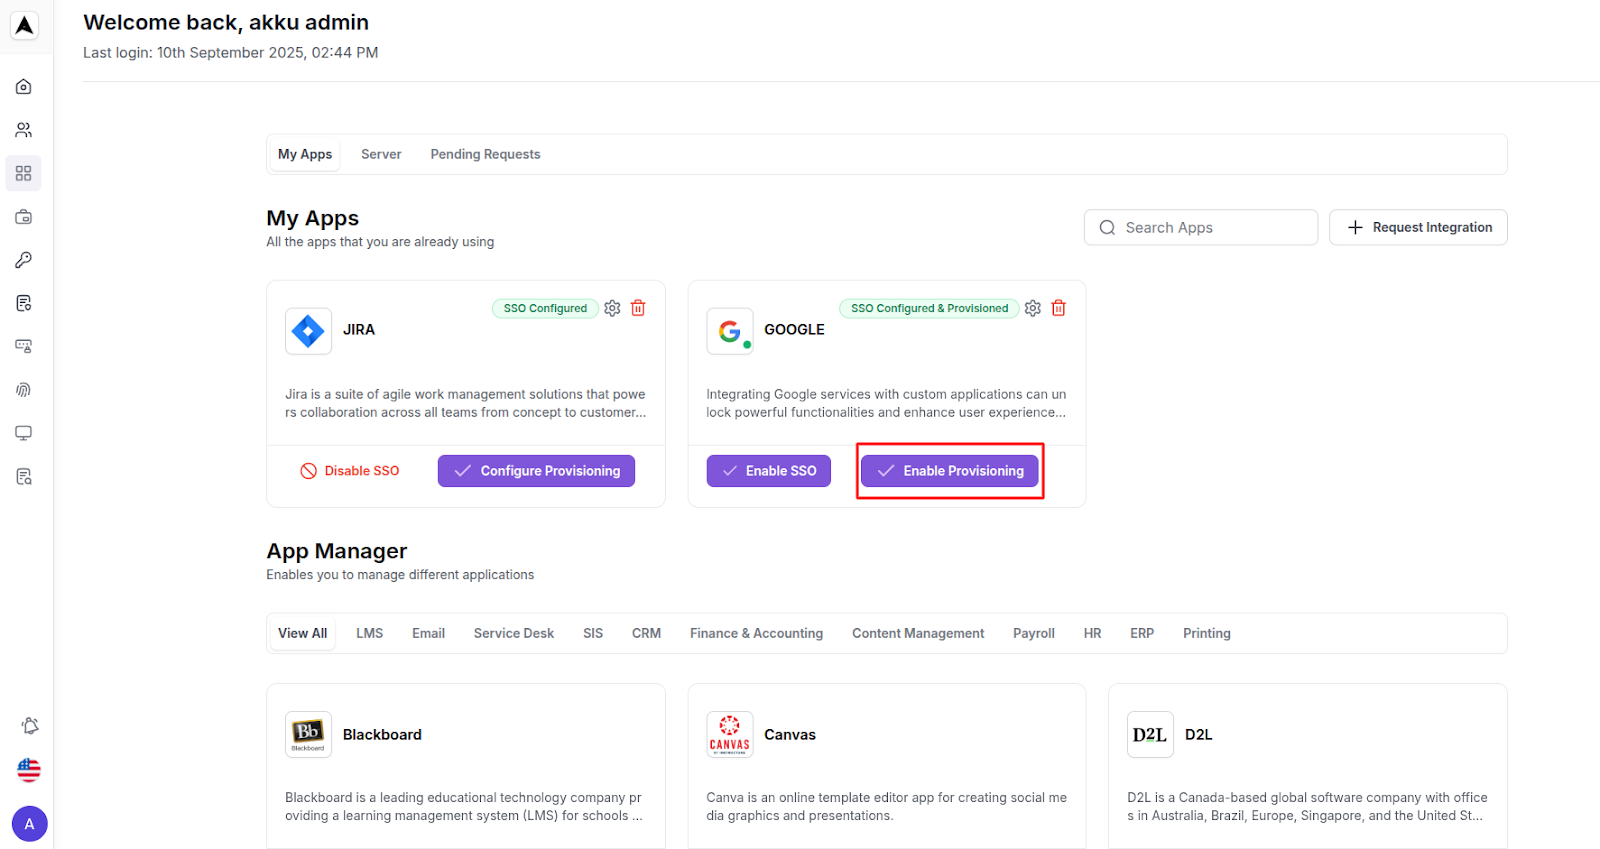
App Manager
You will see available apps for integration, with each card including the app logo, description, and a Setup button.
App Provisioning Configuration
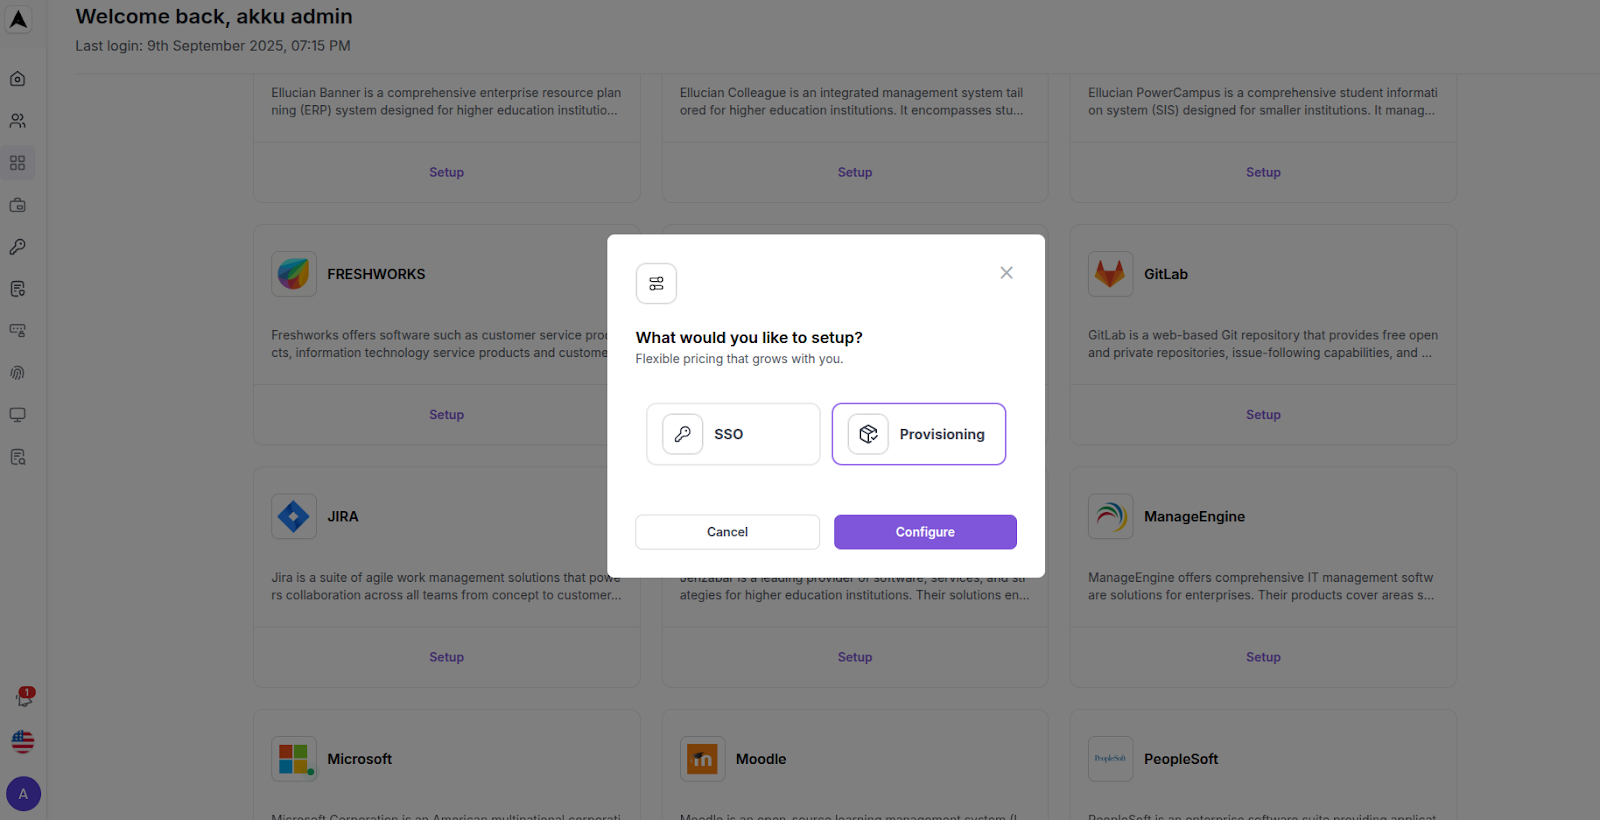
Click on the “Configure” button for an existing app from My Apps, or else click on the "Setup" button for an app from the App Store section.
Let us take Google as an example here for configuration from the App Store.
You will be asked whether you would like to configure SSO or Provisioning.
In this chapter, we will look at the process to configure Provisioning for an app.
Connector Details - General Details:
| Connector Parameter | Value |
|---|---|
| Connector Name | |
| Description | Google Provisioning |
| Service Provider Domain | https://mail.google.com/mail |
| Authentication Type | Bearer Token |
| Token Type | Service Token |
| Connector Type | Rest API |
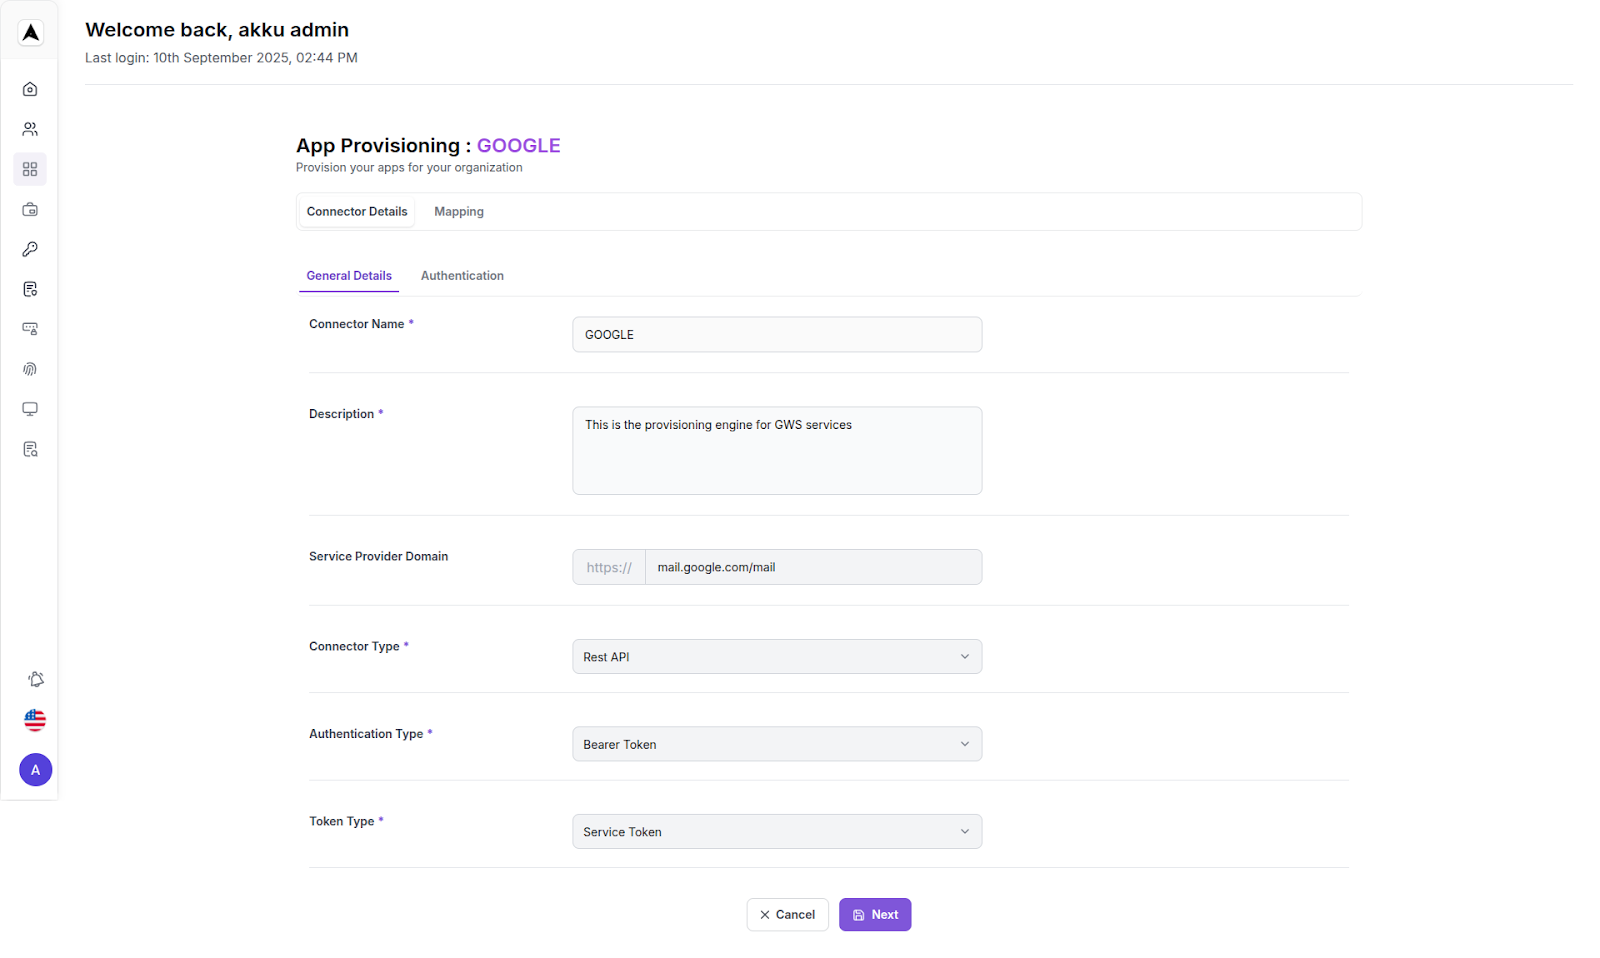
Click on Next to proceed.
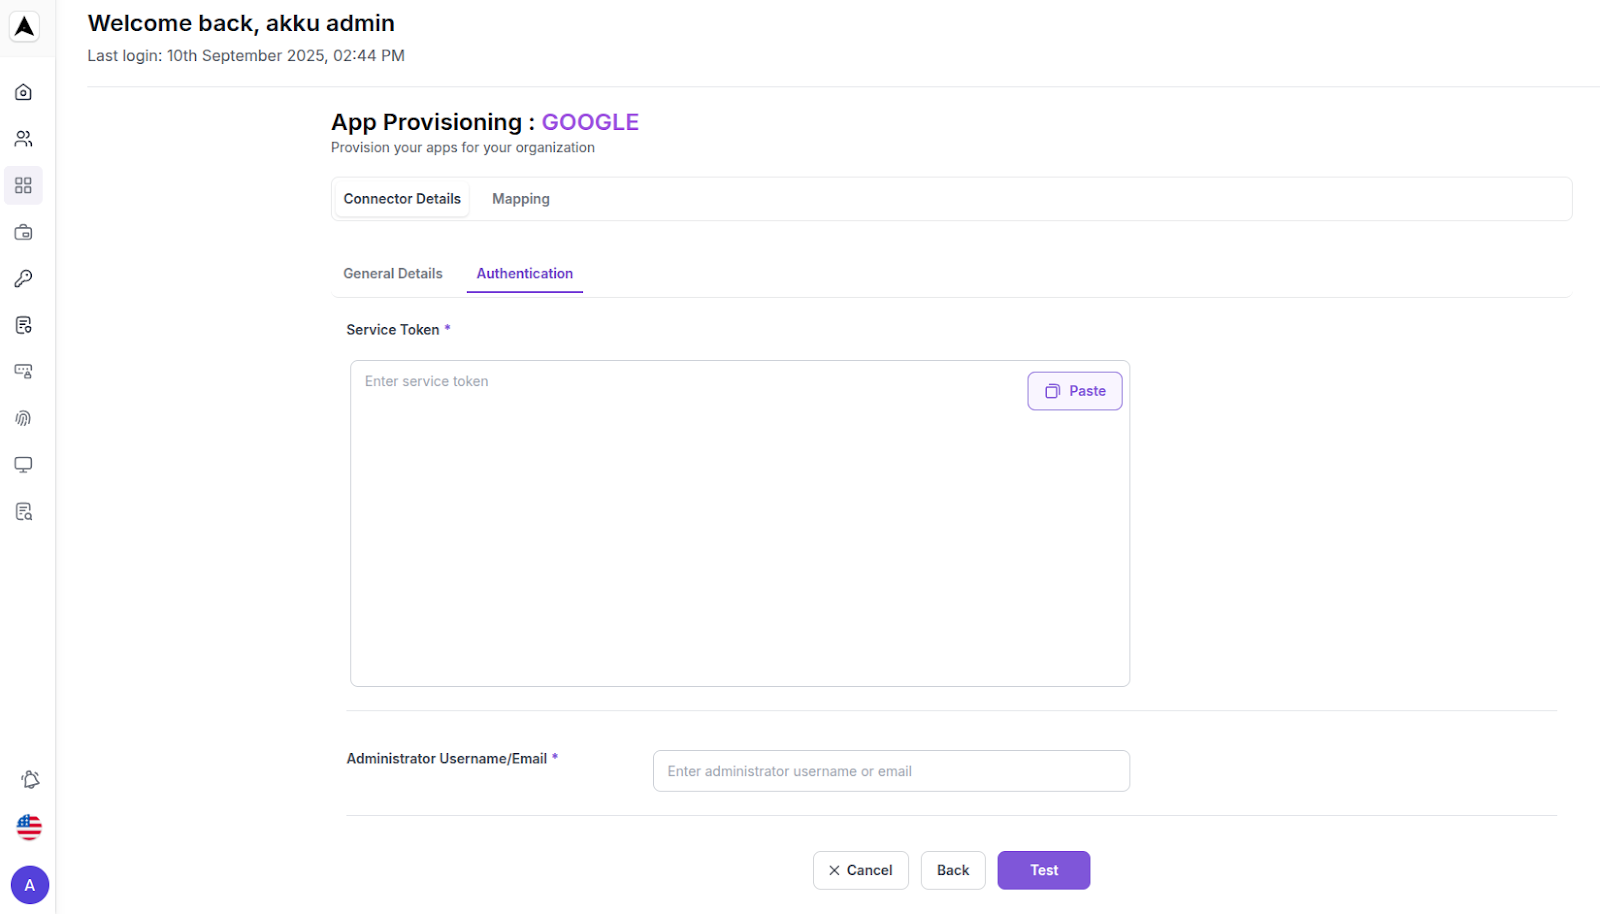
Connector Details - Authentication:
Enter the following details in the respective fields:
| Credential Type | Instructions |
|---|---|
| Service Token | Enter the credential issued by the target application |
| Username/Email | Enter the admin email address or service account email |
Click on the “Test” button to validate the credentials and access
Based on the details entered, you will receive either a success or an error message
How to Get Service Token and Username/Email for Provisioning Authentication:
Service Token
This is usually an API token or access credential issued by the target application (e.g., Google Admin Console, Jira Admin, etc.).
In this example, we will retrieve the service token for Google Workspace.
Log in to Google Cloud Console with an admin account
Navigate to APIs & Services > Credentials
Click Create Credentials > Service Account
Provide a name and role (usually “Admin” or “Directory Admin”)
Screenshot
Once created, go to the Keys tab of the service account
Click Add Key > Create new key > JSON
This JSON file contains your private key and client email - upload this to Akku or extract the token depending on how Akku supports integration
Screenshot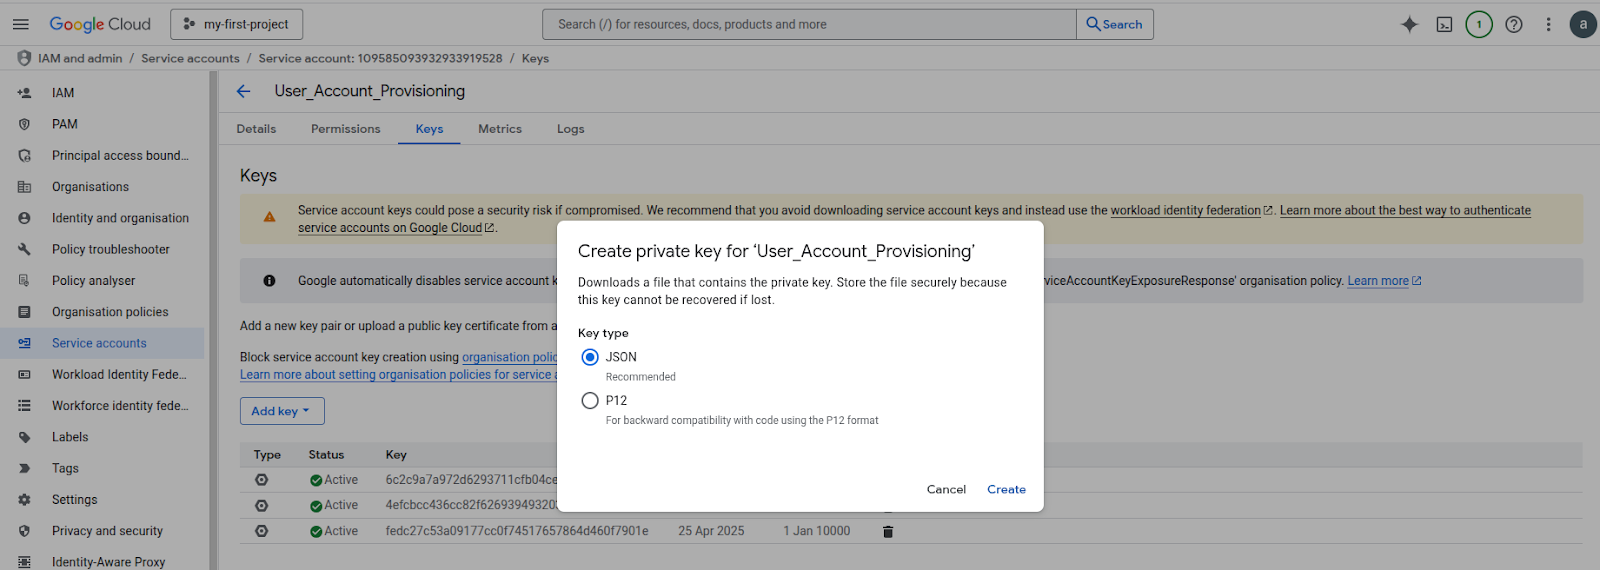
This key/token becomes your Service Token.
Username / Email
This is the admin email address or service account email that has provisioning rights in the connected application.
For Google, use the primary admin email or the client email from the service account.
Connector Details - Authentication (contd.):
Enter the Service Token and Username/Email retrieved in the previous step into the appropriate fields of the Authentication form under Connector Details on Akku.
Next, click on the “Test” button to authenticate the credentials entered.If everything is correct, you will see a success message.
Click on the “Done” button to proceed.

Groups, Roles, and OU Mapping
When provisioning users from Akku to external applications like Google Workspace, it's important to maintain proper alignment between your internal identity structure and the destination application’s structure. Akku simplifies this by allowing you to map Groups, Roles, and Organizational Units (OUs) directly from its interface.
Even when the source (Akku) and target (e.g., Google) names are the same, explicit mapping ensures clarity, maintainability, and auditability.
Mapping - Groups
Map Akku IAM user fields to the app's user schema:
| System | Mapping Instruction |
|---|---|
| Source - Akku | Select the group to be mapped in Akku |
| Target - Google | Select the group to be mapped in Google |

Once mapped, you will see a message saying “Group mapping updated successfully”.
You can also click on the “+” button to add more custom mappings, depending on app support.
Click Next to proceed.
Mapping - Roles
| System | Mapping Instruction |
|---|---|
| Source - Akku | Select the role to be mapped in Akku |
| Target - Google | Select the role to be mapped in Google |

Once mapped, you will see a message saying “Role mapping updated successfully”.
You can also click on the “+” button to add more custom mappings, depending on app support.
Click Next to proceed.
Mapping - OU (Organizational Unit)
| System | Mapping Instruction |
|---|---|
| Source - Akku | Select the organization unit to be mapped in Akku |
| Target - Google | Select the organization unit to be mapped in Google |
Once mapped, you will see a message saying “OU mapping updated successfully”.
You can also click on the “+” button to add more custom mappings, depending on app support.
Click Next to proceed.
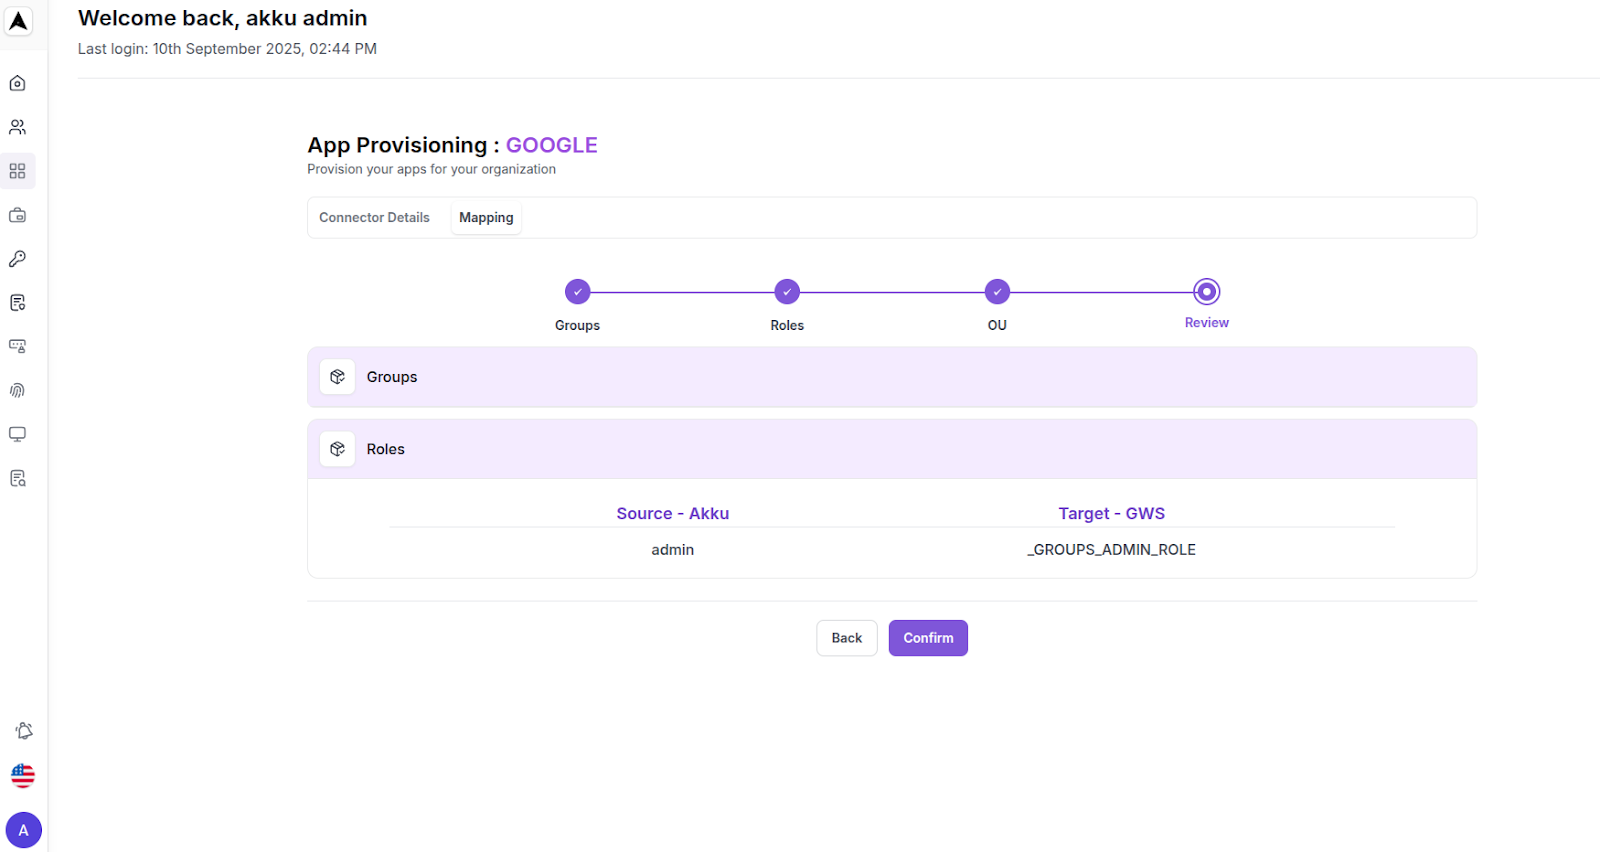
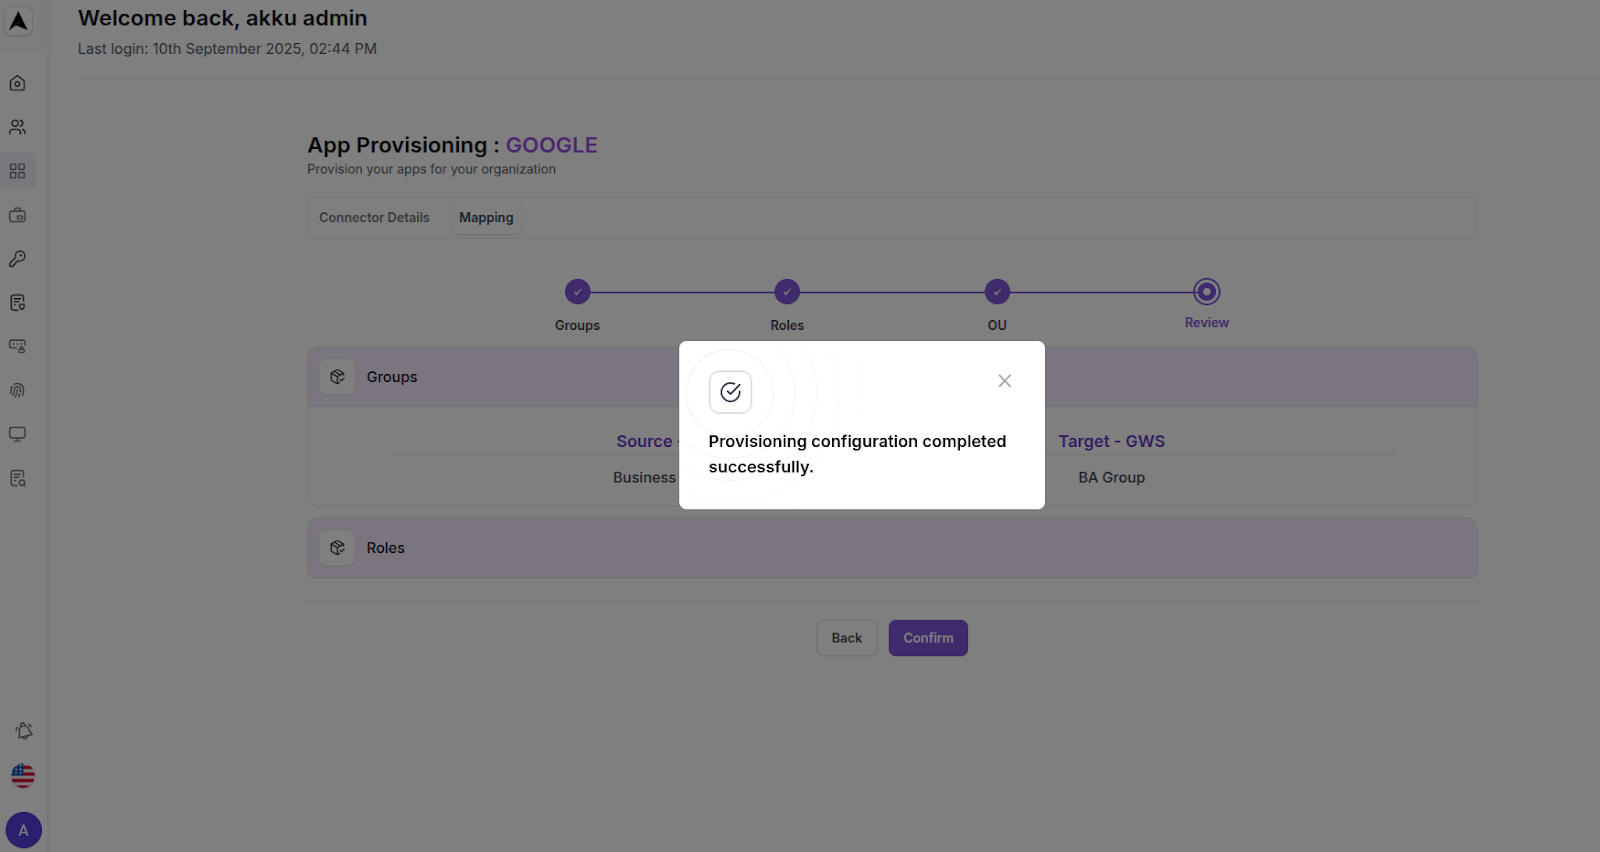
Final Review - User Data Mapping:
Review all mapped attributes and then click on the “Confirm” button to complete the provisioning setup.

Post-Configuration
You will now see the Gmail app under My Apps with the status displayed for Single Sign-On as “Configure”, and for Provisioning as “Inactive”.
Click on the status button for Provisioning, and select the “Active” option.
Once SSO is also configured, the Gmail provisioning will be fully complete and functional, and you will see a notification that says “Provision engine activated successfully”.
Functional Testing
- Go to User Management > Users
- Assign a user to the application you just configured
- Click Sync Now or wait for automatic sync (based on schedule)
- Log in to the application admin console and verify that the user has been created or updated
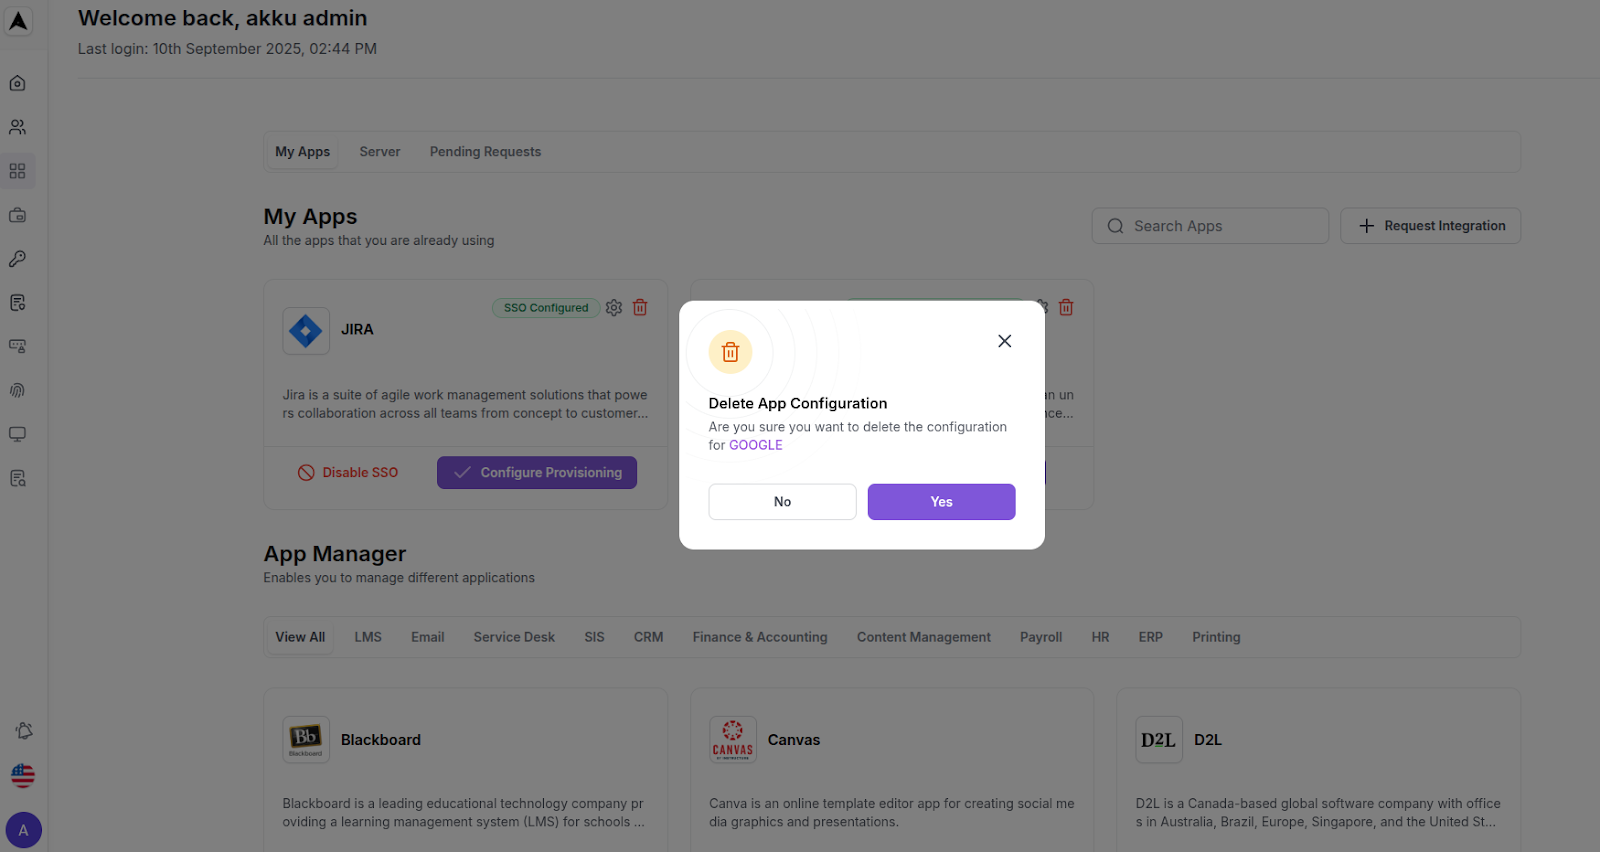
App and User Deletion - Deprovisioning Best Practices in Akku
Deleting an App from My Apps (SSO & Provisioning)
Before removing an application from My Apps, follow these steps to ensure a clean removal without leaving orphaned accounts or access permissions.
Deactivate Provisioning
- Go to App Management > My Apps
- Locate the app you wish to remove
- Under Provisioning, select Inactive
- You will see a confirmation message that says “Provisioning engine deactivated successfully”

Delete the App from SSO
- After deactivation, click on SSO Configuration for the app
- Click on the Delete option and confirm the action

Deleting an App from My Apps (SSO & Provisioning)
When removing a user from Akku IAM, provisioning deactivation is also required to ensure their external app accounts (like Google, Jira, etc.) are removed as part of the deprovisioning workflow.
- Navigate to Users > User List
- Locate the user to be deleted, and click on the Select button beside their name
- Ensure that all app provisioning (if configured) for this user is revoked:
- Go to Connected Apps > Provisioning
- Confirm if the provisioning is active - if yes, then remove or deactivate it
- Now, delete the user
This ensures that the user's access and identity mappings in all connected applications are properly removed, maintaining security and compliance.
